Welcome to Al’s Attic, a home improvement blog dedicated to all things Attics. Let’s look into the often overlooked yet crucial aspect of our homes energy conservation – specifically Attic Door Insulation. As seasoned experts in attic access solutions, we understand the role that a well-insulated loft hatch plays in maintaining optimal energy efficiency within your home.
In this post, we will talk attic door Insulation, looking at both do-it-yourself (DIY) options and professionally installed solutions. Whether you are a hands-on homeowner or prefer the expertise of a skilled professional, we’ve got you covered. Discover the tricks to a more energy-efficient home with our guide on insulated loft hatches and attic door insulation.
If you are considering relocating an attic opening or want an attic ladder stairs fitten in a new location we have an article discussing exactly that.
First we will explore cost-effective DIY methods that sees you the homeowner to take control of your insulation. Following this let’s see the benefits of the professionally installed options that ensure maximum efficiency and long-lasting results. This article aims to serve as your go-to resource and provide you with the knowledge and insights needed to make a more comfortable and sustainable living space.
DIY Options
The type of opening you have to your attic will dictate your solution.
Simple attic hatch (DIY)
If you live in a house built before 2018 and you don’t have an attic ladder, chances are you have a simple attic hatch. This is usually a piece of mdf, plywood or chipboard that is pushed up into your attic when entering your attic.

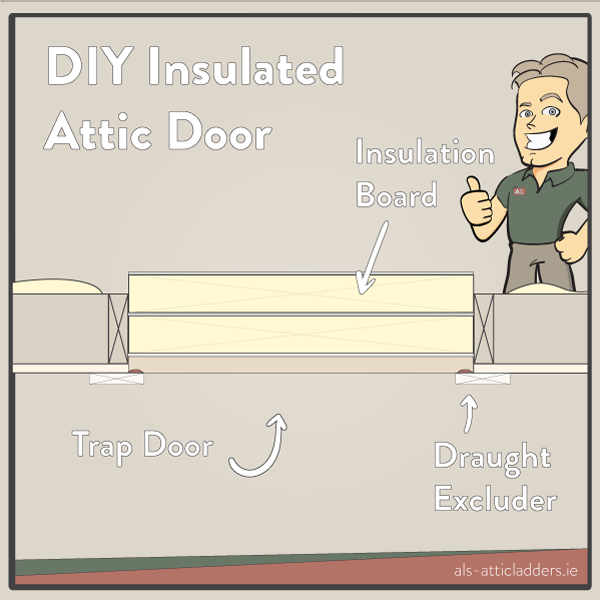
So if this is your opening type you like the odd DIY project lets look at the most popular method of DIY insulation. Simply put all you have to do is take your hatch door and glue some cut boards of insulation to it and seal the opening, that simple. Let’s take a closer look at the steps involved.
*If you don’t enjoy DIY we provide attic hatch insulation as a professional service
You will need insulation board, glue, draught seal and aluminium joining tape (optional)
Step 1
Take your door down from the attic. Use the door to calculate the amount of insulation board you will need, the main thing here is to make sure the width of the insulation board you buy is wider than the shortest side of your door. Two layers of the board is plenty to achieve enough insulation as once the board is above your joists it is enough.
Step 2
Cut the insulation board to as close to the size of the attic door as possible without it protruding. Repeat this for the remaining layers.
Step 3
Depending on your opening dimensions, once the insulation is glued in place you may not be able to take the door up and down through the opening. Keeping this in mind, it’s time to glue the layers of boards in place. This can be done in the attic if necessary. I recommend using a good stick anything glue from a brand like Evo-Stik, once done no need to worry about it dislodging.
Step 4 (optional)
When the boards are dried in place you could use an aluminium joining tape to wrap the cut edges of the insulation boards. This will make them last longer, and stop the attic door insulation from crumbling off the edges when opening the hatch.
Step 5
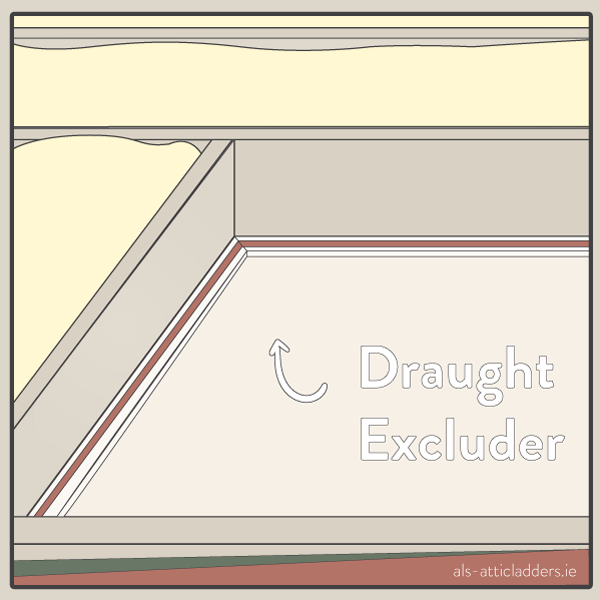
Chances are that no matter how exact you cut the insulation board there will be gaps between it and the opening frame. So to stop any draughts that may undermine your work, it’s time to seal the the part where the door meets the architrave. You can get draught excluder in any hardware shop, it comes with an adhesive back and easy to install. Just run the draught excluder around the opening being mindful to keep it an even height, especially in the corners (cut at an angle if necessary). If it is raised too high at any point it may make the potential draught worse.
*Draught excluder placement on architrave is marked in red.
With that done you can have peace of mind that you won’t be loosing heat through your Attic door insulation.
| Benefits | Drawbacks |
|---|---|
| Cheap | Can’t hinge door |
| Easy DIY job | Not convenient for frequent use |
| Provides good attic door insulation | Doesn’t allow use of attic ladder |
Old Attic Ladder (DIY)
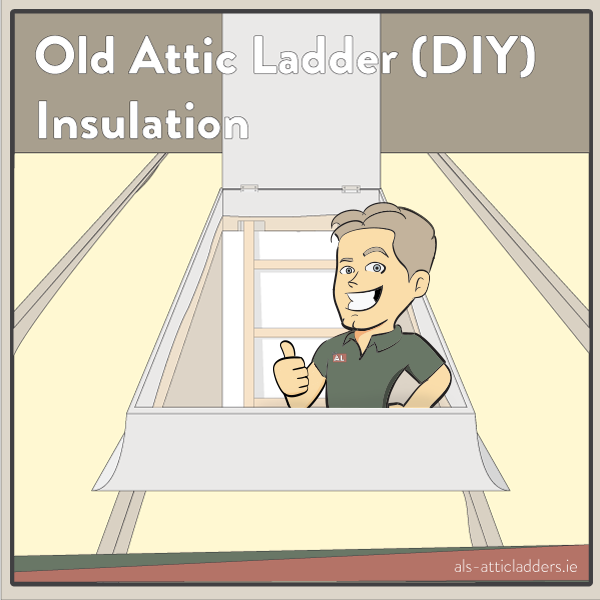
If you have an old wooden attic ladder chances are that it wasn’t built with insulation as an issue. As times are changing so too are the demands we have on products we buy, high quality attic ladders built in the last few years do not compromise with insulation. If you want to know if your current ladder is insulated have a search for the manufacturing model name, there should be plenty of information online. So what do you do if you don’t want to change a ladder you have only five years but still want your Attic door insulation. The budget answer is an ‘Attic Tent’.
An attic tent is an inexpensive DIY solution that is essentially a foil covered canopy made up of thin insulation board. It is designed to cover your attic ladder and both stop draughts and insulate your attic opening. This is a little bit less hands on than the previous option. It should be a straight forward installation, depending on the exact product you go for.
The main thing to consider when choosing an attic tent is whether it suits your situation or not. If you have attic flooring nearly all options will fit your needs, as the canopy can be sealed against the floor. If you do not have attic flooring your options may be more limited, but you’ll need one with a floor section.
So installation should be covered by the manufacturer of the product but essentially you’ll use provided adhesive strips or will need a stapler to mount an inner and outer section. Some are hinged to open, and some utilise a zip.
All in all these are a good solution when you haven’t had your attic ladder for long but it doesn’t meet a modern insulation standard. If your ladder is on the older side or you don’t have time to install an attic tent, skip to the professional solution section, where we will look at some options.
| Benefits | Drawbacks |
|---|---|
| Cheap | Awkward to use depending on product |
| Easy to install | Selecting product to get exact fit could be a challenge |
| Provides good attic door insulation | If you don’t have attic flooring options limited |
| Allows use of current attic ladder |
Professional Options
Simple attic hatch (Professional Solution)
If you have a simple attic hatch as described above and you’re looking for a simple and professional solution, a new insulated opening may be the solution. The most cost effective insulated attic openings are usually the plastic kind. These doors usually require your opening to be enlarged slightly, this is why fitting by a professional is advised. The added benefit to these doors are that they are hinged, so opening and closing is must simpler.
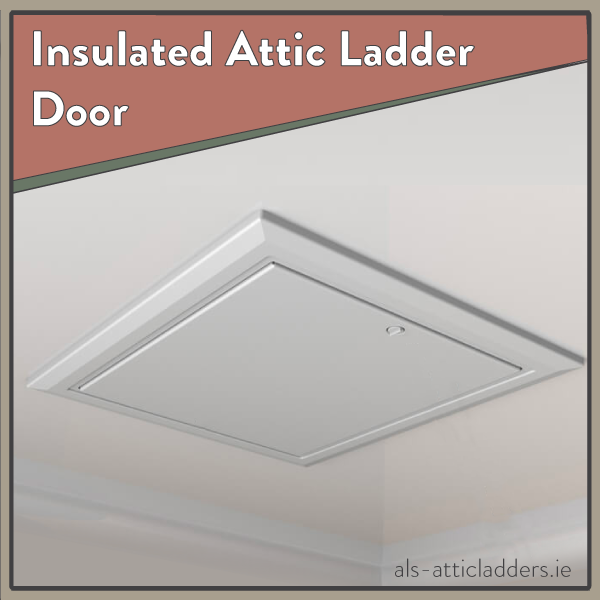
It is hard to get a manufacturer that specifies the exact U-Value of the attic door insulation but they can be was efficient as 1.3 W/m2K and no doubt it will all be much better then your current opening.
| Benefits | Drawbacks |
|---|---|
| Possible to achieve U-Value of 1.3 W/m2K | Not a DIY job |
| Can be hinged for easy use | More expensive solution |
| Larger Opening | |
| Can be used in conjunction with an attic ladder |
Old Attic Ladder (Professional Solution)
If you’re not convincedthat the attic tent is the best solution for your attic, let’s look at the option of having a new ladder installed. If your ladder is older than ten years upgrading to a new ladder is an easy decision, the added insulation alone is worth the upgrade. Not only are the modern ladders more insulated they are also much easier to use and safer.
What is involved, the process of replacing your current ladder is pretty straight forward. The installer will be able to source a ladder to exact frame size as yours. Then it’s a case of removing your ladder and installing the modern one. Most Installations take around three hours from start to finish.
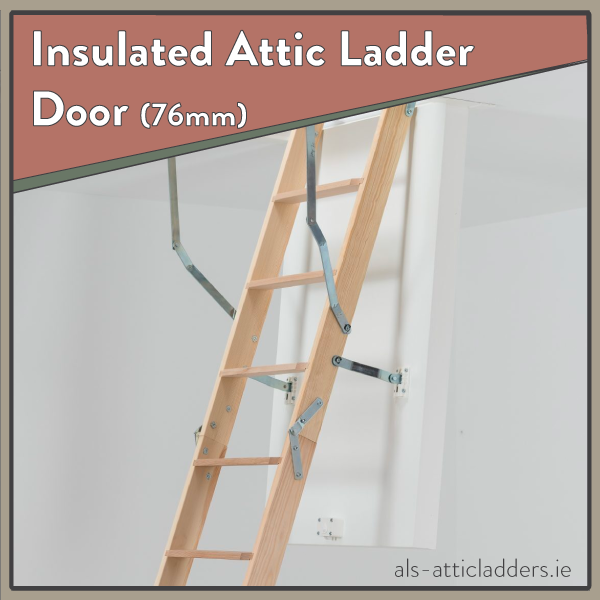
Choosing the right ladder – We offer two of the best quality attic ladders for insulation on the European market. Our cost effective ladder is ‘The Folding Attic Stairs’ and offers all the function of a modern attic ladder with the benefit of a competitive U-Value of 1.3 W/m2K. If you are looking for the best built ladder available, the ‘Gold Star’ is also available. The Gold Star has a 70mm insulated door providing a market leading U-Value of 0.49 W/m2K. Get in touch if you are in Dublin and would like to discuss your options. If you are thinking of relocating your attic opening we have a detailed article discussing important considerations.
| Benefits | Drawbacks |
|---|---|
| Possible to achieve U-Value of 0.49 W/m2K | Not a DIY job |
| More convenient use | More expensive solution |
| Can be installed for you in 3 hours | |
| Safer use of attic ladder | |
| 10 year guarantee |
To wrap up, all the above options are so much better than leaving your attic door as is. With energy prices rising, every bit you can do will drastically address your growing energy bills and living comfort. We hope this article has given you the direction needed to achieve high quality attic door insulation.
We install Attic Ladders throughout the whole of County Dublin, Ireland. If you want a professional solution, don’t wait – contact us today to get your new Attic Ladder installed within the month, and our installers will ensure that you have the full insulation of a modern attic ladder for years to come.
One Response